Microsoft provides many WinPE useful tools to fix a Windows computer. The following are the steps how to run Microsoft WinPE commands.
There are two ways to run Microsoft WinPE commands. One way is to run Microsoft WinPE commands from Windows installation DVD (only available on Windows Vista and above installation DVD). Another way is to run Microsoft WinPE commands from Lazesoft boot disk.
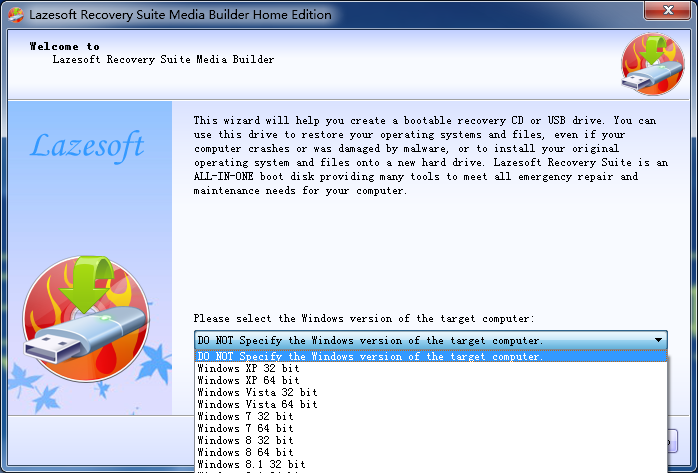
lazesoft media builder select target WinPE boot disk version
To run Microsoft WinPE commands from Lazesoft boot disk:
- Download and install the newest version of freeware Lazesoft Recovery Suite Home Edition.
- After launching Lazesoft Recovery Suite Home Edition, then click <Burn CD/USB disk>.
- Select the Windows version which you want to fix on the Lazesoft Media Builder home page.
- Follow the Lazesoft Media Builder wizard to burn a Lazesoft boot CD/DVD/USB flash disk.
- Reboot your laptop/server/desktop computer from the new burned Lazesoft boot disk.
- Choose <Windows Recovery> module on the boot disk.
- Select your Windows installation.
- Click <Repair Tools> tab and then click <Command Prompt> to launch Command Console.
- You can run the following commands from the launched Command Console:
arp: The TCP/IP address resolution protocol maps between MAC and IP addresses
assoc: Manage associations between file extensions and file types/applications
bcdedit: Manipulate Windows Vista Boot Configuration Data store
bootcfg: Enables users to manage contents of the boot.ini file (Vista uses BCD but maps to boot.ini)
cd: Change/list directory command
chkdsk: Checks layout and structure of Windows disks, with some repair capability
chknfts: Checks layout and structure of NTFS volumes at boot time
cls: Clears the command window
color: Lets users set foreground (text) and background color in the command window
copy: File copy command
date: View or set today’s date
del: File delete command
dir: List directory contents
diskpart: Create, modify, and manage disk partitions at the command line
doskey: Command line editing, recall, and macro definition tool
echo: Repeats input text verbatim
endlocal: Ends localization of variables in a batch environment
erase: Deletes one or more files
exit: Closes command window environment (reboots WinPE, closes WinRE command window)
find: Search for input text string in one or more target files
format: Format hard disk, UFD, or floppy disk
ftp: Invoke command line File Transfer Protocol client services
ftype: Use to display filetypes or to manipulate files by type
ipconfig: Display or manage Windows TCP/IP configuration
md: Make new directory (same as mkdir which is not listed here but works)
more: Manages screen output in screen-size chunks
mountvol: List, create, or delete a volume mount point
move : Move files, renames files and directories
net: A whole family of network service and function controls
netsh: Another whole family of network service and function controls
nbtstat: Display statistics related to NetBIOS over TCP/IP traffic on the network
netstat: Display general TCP and UDP connections, port assignments, and activities
path: Show or manipulate contents of the Windows path variable
pathping: Send an orderly sequence of PING commands to all nodes on a network path
ping: Send an ICMP echo request to some target address to assess reachability and response time
popd: Changes to directory specified in the pushd command (command extensions must be enabled)
print: Provides access to print services from the command line
prompt: Changes command prompt shown in the command window to solicit input (command extensions must be enabled)
pushd: store desired directory target for popd (command extensions must be enabled)
recover: recover readable data from a damaged or defective disk drive
reg: command line registry editing/inspection tool
regedit: Both WinRE and WinPE will open the built-in Windows Registry Editor
regsvr32: use to register or unregister OLE and ActiveX controls, important for troubleshooting
rem: inserts a text comment into a batch or script file
ren: same as rename; use to rename files or directories
replace: replace one or more files in a source directory from a target directory
rmdir: delete directory (also rd)
robocopy: robust file copy for Windows offers wide range of copy controls/checks
route: inspect and manage the contents of TCP/IP static routing table
rundll32: manages relationships between DLLs and devices on a PC; important troubleshooting tool
set: inspect, add, alter, or delete global environment variables
setlocal: inspect, add, alter, or delete local environment variables
sfc: system file checker; use with /verifyonly to check Windows OS files
start: opens a separate window to run a program or command
subst: use to associate a path with a virtual drive letter
time: view or set current time
title: sets title for command window
tracert: traces all routers between sending and target Internet hosts
type: writes contents of target file to command window display
ver: displays Windows version in use
verify: verifies accuracy of file copies upon completion
vol: display or alter disk/volume name
xcopy: tool for copying multiple files and entire directory structures